The wireless in-ear monitoring system provided by Audiofusion offers a convenient and low-cost solution for your band or worship team to seamlessly hear their live performances on stage. This ensures a solid “in the pocket” performance and pleasant experience for your audience or congregation. Here is a full walkthrough on how to scan for Wi-Fi and set up your router to get the best sound quality with the Audiofusion system.
Let’s first talk a little bit about Wi-Fi Explorer Lite. Wi-Fi Explorer Lite is an app that we use to scan the Wi-Fi in your space to see which channels you should choose and what channel width you should use on the router. This is a free download from the Mac App Store. The full version is $9.99, but for our purposes, Wi-Fi Explorer Lite is perfectly fine.
We have also used Wi-Fi Scanner, which is a great tool. That one does come with a price tag, though. For this blog, we’ll use Explorer Lite as the example.
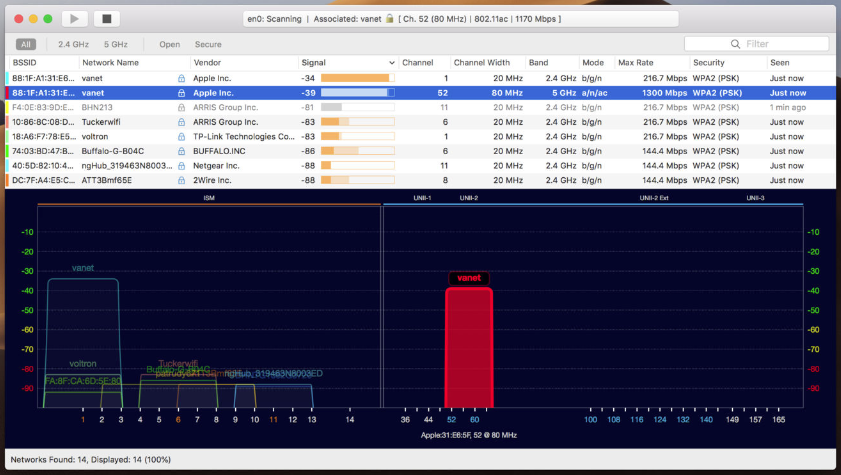
When you open Wi-Fi Explorer Lite, you’ll see on the top half of the screen that it lists each of the Wi-Fi routers that are running in your space. More specifically it lists separately each radio broadcasting from each of the Wi-Fi routers running in your space.
If you have a dual band router, it means that you have a router with one radio broadcasting in the 2.4 GHz band and you’ve got one radio broadcasting in the 5 GHz band. If you have one of the tri-band routers we recommend, then your router will have one radio broadcasting in the 2.4 GHz and two radios broadcasting in the 5 GHz band.
The lower half of Wi-Fi Explorer Lite has a graphic interface which shows you all the routers with a radio broadcasting in the 2.4 GHz band and all the routers with a radio broadcasting in the 5 GHz band. For Audiofusion, make sure that all of your devices running Performer are connecting to your Wi-Fi router only through one of the radios broadcasting in the 5 GHz band.
If you look at what’s running in your space, you would see that Wi-Fi Explorer Lite lists the name of the router. It will show you the relative signal strength based on the location of that radio relative to the Mac that’s running the scan. So, when you’re running your scan, you want to physically put the Mac on stage or wherever your Performers are going to be standing so that the calculation for relative signal strength is accurate.
It shows you the channel you selected for each radio and the bandwidth at which each is broadcasting. You can set each of the radios broadcasting in the 5 GHz band to run at one of three bandwidths: 20, 40, or 80 MHz. But for the purposes of Audiofusion, 20 MHz just isn’t enough bandwidth to deliver real-time audio. Make sure yours are set to either 40 or 80.
The max rate is the corresponding megabits per second that radio can broadcast when it’s set at that bandwidth. Broadcasting at 40 MHz will reduce the max rate which can limit the number of performers that you can connect to that radio.
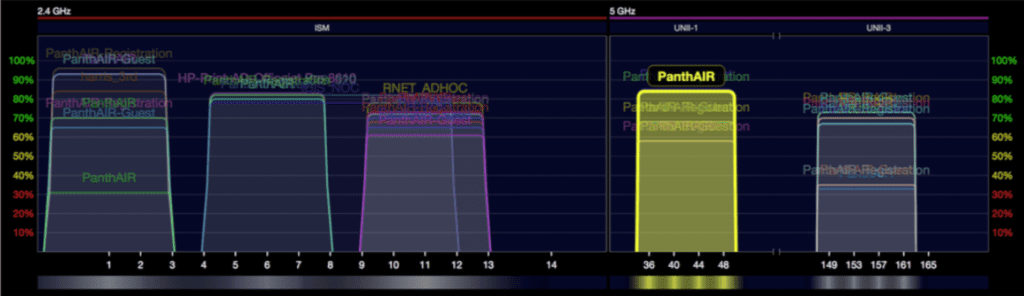
Any of the Wi-Fi routers that we recommend can run in one of two channel ranges. In a lower range; channels 36 to 48. In upper range; channels 149 to 161. Now, each of those channels (36, 40, 44, and 48) represents 20 MHz of bandwidth. For example, you could set the router you’re using to access the internet to channel 149 and set to broadcast at 40 MHz.
It would then aggregate both channel 149 and channel 153 next to it. So, it would be using 40 MHz of bandwidth and taking up two channels worth of range.
If you set the radios on your router to broadcast at 80 MHz in the 5 GHz band, then you’ll be utilizing all four channels in the available range. If you were looking at the scan of the Wi-Fi that was running in your space, you would look at the two channel ranges that are available and might see that there are radios already broadcasting in the upper range, but there’s really nothing broadcasting down in the lower range.
You would then set one of your radios on your router to broadcast at 80 MHz wide, utilizing all four channels available in the lower range. We do recommend giving each of your radios a separate name or SSID so that you know which one you’re connecting with instead of allowing the router to choose for you automatically.
We’ll go through an example of a radio conflict. Say I’ve got my tri-band Linksys router. I’ve got the radio broadcasting in the lower range. I’ve called it “5_GHz_Low”, and I’ve got “5_GHz_High” running as well. Graphically Wi-Fi Explorer Lite would show this conflict with these other radios that are broadcasting in that range.
What I would do is, instead of running “5_GHz_High” at 80 MHz wide, I could go in and change that on my router and try to keep from overlapping any of the other signals that I’m up against. So, if I were to go into Safari, making sure that I’m connected by ethernet to my router, I could then access the router directly simply by typing in the IP address.
By default, it’s 192.168.1.1. I would sign in with my administrative password, which would be different than the password I used to connect to one of the radios. That would take me to the main setup page. Now, if I’m not using the Linksys AC5000 router or one of the routers that we recommend, then mileage will vary. I’m using the Linksys as an example in this blog.
I would want to turn off band steering, or the router’s equivalent to Smart Connect, and turn off the 2.4 Ghz band completely, unless I would want to use that to connect with my mixer for the control surface. It’s just important to make sure that none of the devices running performer are connecting to the 2.4 GHz band. Then I would set the radio on the router to broadcast at 80 MHz on a channel where there is no conflict.
It would then aggregate all four of those available channels to get a nice throughput. It would co-exist very nicely with the other Wi-Fi that I had running in that upper range.
Keep in mind that Wi-Fi channels are regulated by local authorities. So, while these principles will apply to any locale, your specific channel selections and configuration options will be different in your area.
If your Wi-Fi is impacted, that’s going to be a little bit more difficult. You could try running a router that’s using the DFS channels, but if you’ve got one of the standard off-the-shelf routers that we’ve recommended, your best bet might be to run both of your radios broadcasting in the 5 GHz band at 80 MHz and try to go right over the top of everything else that’s already there.
It will be critical in this kind of environment to position the router on stage or as close to the stage as possible so that the relative signal strength of your radio will be higher when compared to that of the other radios that you’re up against.
The key to it all is that you can see what exactly is going on by using the Wi-Fi Explorer Lite. This will give you a graphical look at which channels are being used, what conflicting radios you are up against, and how the changes that you make on your router will affect how your radios are set to broadcast.
When using Audiofusion’s monitoring system, you can contact us at any time if you need support or tips on how to properly set up your Wi-Fi. The important thing is that we get you set up and playing quickly and easily.
If you’ve never used our in-ear system and would like to give it a whirl, we provide the ability to try it for free in Gear Test Mode so you know it will meet the needs of your band or worship team.

